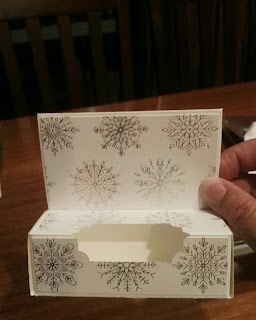
I made a bunch of these to sell at craft fairs last year, and they were quite popular. This year I've realised that you don't have to make them with Christmas paper - you could also make them with regular paper, and they would be suitable for all occasions.
I made this one with the gorgeous Year of Cheer paper - it's classy and easy to use.
The gift card (I'm talking about a card that is the same size as a credit card, which is a fairly standard size in New Zealand) slides in the top of the box. The Ferero Rocher are a beautiful and again, classy addition to a lovely package.
This design is from IntatwyneDesigns.co.uk. This very talented lady came up with this. She has a video on her website showing you how to make this. Feel free to go have a look, however I've tried to do written instructions here, so you should be able to make it without too many hassles.
First up, you need a piece of A4 (New Zealand) cardstock, cut to 11 1/4" x 7 3/4"
On the 7.75" side you score at 1/2", 1 7/8", 5 7/8" and 7 1/4"
On the 11 1/4 side you score at 1/2", 1 7/8", 31/4", 4 5/8", 8 3/8", 10 3/4"
On the 7 3/4 side (holding the end with the large gaps between the score lines at the top), score at 1 1/4" to the second score line only
On the 11 1/4" side (holding the end with the smaller gaps between the score lines at the top), score at 6" only to the second score line. Score both at top and bottom of cardstock.
You'll need some Designer Series Paper:
1 of 3 7/8" x 2 1/4"
2 of 1 1/4" x 3 7/8"
2 of 1 1/4" x 1 1/4"
You will be left with a rectangular piece of cardstock with score marks all over it. Next you cut it out to this exact shape. This has the areas with the large gaps between score lines at the bottom.
Next you want to glue the card holder in place. This is as simple as this:
The reason for doing this is that otherwise the card would completely disappear inside the holder. By gluing this flap down, it means that the card remains near the entrance of the holder, making it easy to get out again.
Next you glue this flap on the outside and then fold it into place.
You fold the holder at the score line by my thumb, and glue that tab. This will make the actual gift card holder part of the design.
Now you want to make the gap that is the window in the box. Take the bottom rectangle and fold it up over the next rectangle, use the Everyday Label Punch, punch the hole as shown here - using only half of the punch.
It's important to do this step before you attach the paper as once you've got 4 layers to go inside the punch it won't be able to punch (ask me how I know this!)
Now you go to the front and add the paper you've chosen (both pieces of 1 1/4" x 3 7/8"
Stick these to the card - just remember not to put any adhesive over the area where the hole is.
Once these are stuck down, fold backwards so the back of the paper is what you can see, position the punch again in exactly the same place as before and punch
Adhere the 1 1/4" x 1 1/4" paper to the top flaps. On the right side, your cardstock should now look like this:
Next I adhered the larger piece of designer series paper to the front of the gift card holder part.
Fold each of the horizontal score lines (this is the part that will make up the box part)
Once that's done, hold the card so the gift card holder is at the top, the correct way around. Glue the tab at the bottom
Now fold this up and adhere it to the card just underneath the large piece of DSP you've already prepared.
You'll be able to gently form a box, and you'll note that there are tabs on the left and right. Some you have already curved, some are straight. I cut a bit extra off the straight ones, then they form the flaps and the curved one needs to be bent to form the box closure. Hopefully this picture explains all!
Once carefully folded in place, your box will look like this:
Now your box will look like this:
And all you need to do is add Ferero Rocher. Yummy!
I used the Liquid Multipurpose Glue for all the gluing on this project - I have found that it adheres really well, so I can make these well in advance of a craft fair and they're all ready to go on the day.
If you live in New Zealand, and would like to purchase any of the products I've used to make this Gift Card Holder, please click on the pictures below
I hope you enjoyed this, and if you made it I hope the recipient loves it!
Product List


No comments
Post a Comment